![[Register]](help/registerbtn.jpg) button on the login screen. This takes you to the registration page where you must
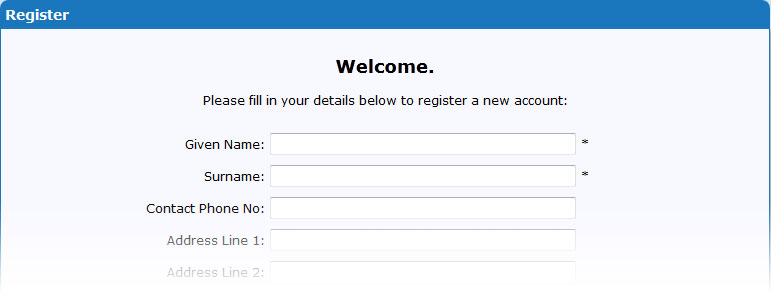
fill out your details. Note that while a phone number and address are not required, they can be useful as secondary contacts if we need to get in touch with you.
button on the login screen. This takes you to the registration page where you must
fill out your details. Note that while a phone number and address are not required, they can be useful as secondary contacts if we need to get in touch with you.Our online entry system is designed to be as intuitive as possible. The system requires that riders be added to a user account, then horses added for each rider as you wish them to be entered. Along the way, blue information boxes such as the one below will help provide information on each step of the process.

Additionally, you may come across red warning information boxes when the information you entered is not correct or a problem has occurred. The information they provide should help you to remedy the situation.
Each step of the process is described in detail below:
Start the registration process by clicking the button on the login screen. This takes you to the registration page where you must
fill out your details. Note that while a phone number and address are not required, they can be useful as secondary contacts if we need to get in touch with you.
You must then enter your email address and a password you wish to use to access your account. Please ensure that your email address is active as it will be your primary contact for the system. Choose a password that you will remember, but it must be longer than 6 characters for security reasons.

Once the form is complete, type the numbers and/or letters displayed in the security image into the box below it like the example below:

Click to complete the process.
Once your account has been created, you will be taken to the main entries page. The next step in the process is adding a rider to the system. This is done with the Add Rider section of the page.

Fill the riders name and EA registration number into the relevant fields and click the ![[Add Rider]](help/addriderbtn.jpg) button. If a rider does not have an EA registration number because they are only competing
in unofficial classes, type 'none' into the EA No box.
button. If a rider does not have an EA registration number because they are only competing
in unofficial classes, type 'none' into the EA No box.
This step is repeated for as many riders as you wish to enter for the show.
After a rider is added, the option to ![[Add Horse]](help/addhorsebtn.jpg) becomes available for that rider under the 'Horse & Rider Combinations' section of the main page, as in the example below.
becomes available for that rider under the 'Horse & Rider Combinations' section of the main page, as in the example below.

Clicking the [Add Horse] button will launch the Enter Horse page. The first thing you need to do is enter the name and EA registration number of the horse you are entering.

Enter the horse in any classes you wish to compete in by selecting the checkbox next to it. Classes are grouped on the page by the day they will be run and then into subgroups based on their ring.
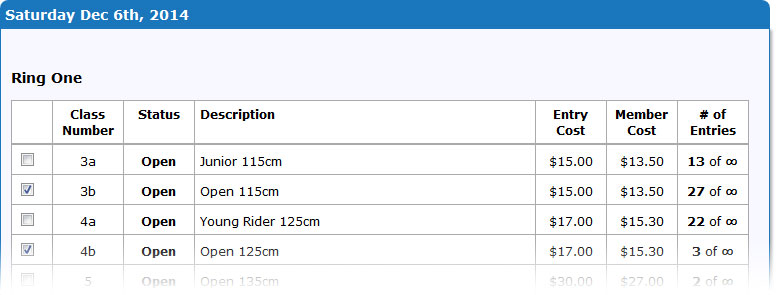
In the example above, the horse has been entered in the Open 115cm and Open 125cm. You can select as many classes as you like at once as long as they are not closed or full, in which case they will appear like the example below and the checkbox will be disabled:

Once finished selecting your classes, click the ![[OK]](help/ok.jpg) button at the bottom of the page.
button at the bottom of the page.
Repeat this step for any other horses you wish to enter for this rider.
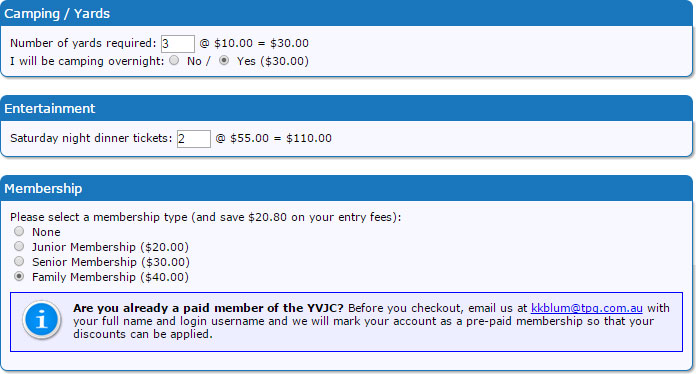
The next section of the page is for any compulsory Additional Charges, as in the example below. These numbers are determined by the entries you have placed and cannot be changed.

After this, the next sections allow you to select whatever additional options are available for the show. In the example below, this is where you specify the number of yards you need, if you will be camping or not, how many tickets for the Saturday night entertainment you want, and finally the Membership Option you want.
It is important that you click the ![[Calculate Total]](help/calctotalbtn.jpg) button! This saves any
changes you have made to the additional options and calculates the total accordingly, including any membership discounts (if applicable).
button! This saves any
changes you have made to the additional options and calculates the total accordingly, including any membership discounts (if applicable).
The final section of the page gives a short running total of any entries and options you have selected, along with any deductions from previously paid invoices or discounts.
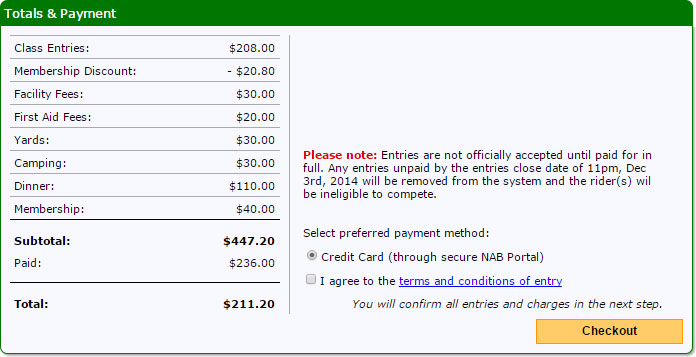
From here, you need to select a payment method, agree to the terms and finally click the ![[Checkout]](help/checkoutbtn.jpg) button. Note that all of the charges
will be detailed and confirmed in the next step, however at this point you should make sure all the entries you have done are accurate.
button. Note that all of the charges
will be detailed and confirmed in the next step, however at this point you should make sure all the entries you have done are accurate.
Once you've clicked on the main entries page, you will be given an invoice that details all of the entries you have made and
options you have selected. At this point, it is important that you double check all of your entries. To print the invoice,
press ctrl-p on the keyboard. To checkout and pay, click on ![[Submit & Pay]](help/submitpay.jpg) .
.
This will take you to the secure NAB portal for processing your credit card. Enter your card details here and click 'Authorise Payment' to complete the entry process.